Deployment Guide: The Prompt Engineer's Toolkit
This guide provides a step-by-step process for deploying "The Prompt Engineer's Toolkit" to a live web hosting environment. The primary goals are to make the application publicly accessible while ensuring the user experience remains smooth and the Gemini API key is kept secure.
Core Concept: Separating Frontend and Backend Logic
The index.html file you have is the frontend—it's what users see and interact with in their browser. However, placing an API key directly in frontend code is a major security risk, as anyone can view it.
To solve this, we will create a simple backend proxy using a serverless function. This is a small piece of code that runs on your hosting provider's servers, not in the user's browser.
The new workflow will be:
User's Browser (Frontend) sends the prompt to your secure Serverless Function (Backend).
Your Serverless Function, which securely stores the API key, calls the Gemini API.
The Gemini API responds to your serverless function.
Your Serverless Function sends the response back to the user's browser.
This way, your API key is never exposed to the public.
Step 1: Choose a Hosting Provider
For a single-file application with a simple backend function, a modern hosting provider with integrated serverless functions is ideal. These platforms typically offer generous free tiers.
Recommended Options:
Netlify: Excellent for static sites and serverless functions (Netlify Functions). Very user-friendly.
Vercel: Similar to Netlify, with a strong focus on developer experience and serverless functions (Vercel Functions).
Firebase Hosting: Integrates seamlessly with Google Cloud Functions for your backend proxy.
For this guide, we will use Netlify as an example, but the principles are nearly identical for Vercel.
Step 2: Prepare Your Project Structure
Instead of just one file, you'll need a simple project structure.
Create a new folder on your computer (e.g.,
prompt-toolkit-deploy).Inside this folder, place your
index.htmlfile.Create a new folder named
netlify.Inside
netlify, create another folder namedfunctions.Inside
functions, create a JavaScript file namedgemini-proxy.js.
Your project structure should look like this:
/prompt-toolkit-deploy
|-- /netlify
|   |-- /functions
|       |-- gemini-proxy.js
|-- index.html
Step 3: Create the Serverless Function (Backend Proxy)
Open the gemini-proxy.js file and add the following Node.js code. This code creates the secure proxy.
// File: /netlify/functions/gemini-proxy.js

exports.handler = async function (event) {
  // 1. We only accept POST requests
  if (event.httpMethod !== 'POST') {
    return { statusCode: 405, body: 'Method Not Allowed' };
  }

  // 2. Get the Gemini API Key from secure environment variables
  const GEMINI_API_KEY = process.env.GEMINI_API_KEY;

  if (!GEMINI_API_KEY) {
    return { statusCode: 500, body: 'API key not found.' };
  }

  // 3. Construct the real API URL
  const API_MODEL = 'gemini-2.5-flash-preview-05-20';
  const API_URL = `https://generativelanguage.googleapis.com/v1beta/models/${API_MODEL}:generateContent?key=${GEMINI_API_KEY}`;

  try {
    // 4. Make the request to the Gemini API
    const response = await fetch(API_URL, {
      method: 'POST',
      headers: {
        'Content-Type': 'application/json',
      },
      // Pass the user's request body directly to the Gemini API
      body: event.body,
    });

    if (!response.ok) {
        const errorBody = await response.json();
        console.error('Gemini API Error:', errorBody);
        return { statusCode: response.status, body: JSON.stringify(errorBody) };
    }

    const data = await response.json();

    // 5. Return the successful response to the frontend
    return {
      statusCode: 200,
      body: JSON.stringify(data),
    };
  } catch (error) {
    console.error('Proxy Error:', error);
    return {
      statusCode: 500,
      body: JSON.stringify({ error: 'Failed to fetch from Gemini API' }),
    };
  }
};
Step 4: Update the Frontend index.html File
Now, you need to make a small change to your index.html file so it calls your new proxy function instead of the Google API directly.
Find the <script> section at the bottom of index.html and modify the following constants and function:
Remove the
API_KEYconstant entirely. It's no longer needed on the frontend.Change the
API_URLto point to your new serverless function. Netlify automatically makes functions available at the/.netlify/functions/path.Update the
callGeminiAPIfunction to work with the new proxy URL.
Find this code:
// ... existing code ...
const API_MODEL = 'gemini-2.5-flash-preview-05-20';
const API_KEY = "";
const API_URL = `https://generativelanguage.googleapis.com/v1beta/models/${API_MODEL}:generateContent?key=${API_KEY}`;

async function callGeminiAPI(payload, maxRetries = 3) {
// ... existing code ...
And change it to this:
// ... existing code ...
// The API_KEY is now handled securely on the backend.
// This URL points to our serverless proxy function.
const API_URL = `/.netlify/functions/gemini-proxy`;

async function callGeminiAPI(payload, maxRetries = 3) {
// ... existing code ...
The rest of the callGeminiAPI function can remain the same, as it will now send its request to your proxy.
Step 5: Deploy to Netlify
Sign up or Log in to Netlify.
From your dashboard, click "Add new site" -> "Import an existing project".
Connect to a Git provider (GitHub is recommended) and authorize Netlify.
Choose the repository that contains your
prompt-toolkit-deployfolder.Netlify will automatically detect the settings. You shouldn't need to change any build commands. Click "Deploy site".
The initial deployment will fail because the API key is missing. This is expected.
Step 6: Securely Add Your API Key
This is the final and most important step.
Go to your new site's dashboard in Netlify.
Navigate to "Site configuration" -> "Environment variables".
Click "Add a variable".
For the Key, enter
GEMINI_API_KEY.For the Value, paste your actual Gemini API key.
Click "Save".
Go back to the "Deploys" tab and trigger a new deploy by clicking "Trigger deploy" -> "Deploy site".
This new deployment will use the environment variable, and your serverless function will now be able to authenticate with the Gemini API securely.
Your "Prompt Engineer's Toolkit" is now live and fully functional! You can access it at the URL provided by Netlify.
Cloudflare Example:
Yes, deploying to Cloudflare Pages is essentially the same process, built on the exact same principles. The core concept of separating your static index.html (frontend) from a secure serverless function (backend proxy) remains the key to a successful and secure deployment.

You'll find that the workflow is remarkably similar, with the main differences being in folder names and the user interface where you set up your project and environment variables.

Here’s a breakdown of the minor adjustments for Cloudflare Pages:

Key Similarities:
Static Hosting: Both platforms excel at hosting your index.html file on a global content delivery network (CDN) for fast loading times.

Serverless Functions: Cloudflare Pages uses Cloudflare Functions which serve the same purpose as Netlify Functions. They run on Cloudflare's edge network.

Environment Variables: You will still use environment variables in the Cloudflare dashboard to store your GEMINI_API_KEY securely.

Git Integration: The recommended deployment method for both is connecting a Git repository (like GitHub) for continuous deployment.

Key Differences (Cloudflare vs. Netlify):
Functions Folder Name:

Netlify looks for serverless functions in a /netlify/functions/ directory by default.

Cloudflare looks for them in a top-level /functions/ directory.

Dashboard UI:

The user interface for adding a new site, connecting a repository, and setting environment variables will look different, but the functionality is identical.

Step-by-Step Process for Cloudflare Pages
Here is how you would adapt the previous deployment guide for Cloudflare:

Step 1: Adjust Your Project Structure

Your project folder should be structured like this. Notice the functions folder is now at the top level.

/prompt-toolkit-deploy-cf
|-- /functions
|   |-- gemini-proxy.js  // The code inside this file is exactly the same!
|-- index.html
Step 2: Update index.html

You need to change the API_URL to point to the Cloudflare function's path. Cloudflare makes functions available directly by their name.

Find this line in your <script> tag:

JavaScript

const API_URL = `/.netlify/functions/gemini-proxy`;
And change it to this for Cloudflare:

JavaScript

const API_URL = `/gemini-proxy`;
(Note: Cloudflare's routing is slightly different. The function gemini-proxy.js becomes available at the /gemini-proxy endpoint.)

Step 3: Deploy to Cloudflare Pages

Log in to your Cloudflare dashboard.

Navigate to Workers & Pages and select the Pages tab.

Click "Create a project" and connect to your Git provider (e.g., GitHub).

Select the repository containing your project.

In the "Build settings," Cloudflare will likely auto-detect that you have a static site. You shouldn't need a build command or a build output directory. Just click "Save and Deploy".

Step 4: Securely Add Your API Key on Cloudflare

After the initial deployment, navigate to your new project's dashboard in Cloudflare Pages.

Go to the Settings tab.

Select Environment variables.

Under "Production," click "Add variable".

Enter GEMINI_API_KEY as the Variable name.

Paste your actual Gemini API key as the Value.

Crucially, click the "Encrypt" button to ensure the value is stored securely.

Click "Save".

Go back to your project's Deployments tab and trigger a new deployment to apply the environment variable.

That's it! The result is identical: a fast, globally available application with a secure backend proxy to protect your API key.
 The user experience and functionality will be exactly the same.
Integrating Gemini API
I'm thinking about how to integrate Gemini API features into the "Prompt Engineer's Toolkit." It's a prime chance to make the application more interactive and show the direct potential of LLMs to prompt engineers. This addition will make the toolkit even more useful.
Brainstorming Gemini Features
I've been exploring the possibilities of integrating the Gemini API into the Prompt Engineer's Toolkit. I'm focusing on two new features to enhance the interactive prompt building experience: "Optimize My Prompt" and "Generate Variations." The "Optimize My Prompt" feature would allow users to send their constructed prompt to Gemini for expert analysis and suggestions, directly enhancing their skills. The "Generate Variations" feature will then take that and produce multiple unique prompts to show the breadth of possibilities, really letting users understand prompt engineering techniques better.
Expanding Toolkit Functionality
I'm now zeroing in on integrating the "Optimize My Prompt" feature into the Toolkit. Using Gemini's API, I will craft a meta-prompt for optimal analysis and suggestions. The "Run Prompt" feature is also on my agenda. I'm modifying the app's HTML and JavaScript to include buttons and display areas for the API responses. I will make a generateContent call to the Gemini API with the gemini-2.5-flash model.
Developing Optimization Feature
I've been concentrating on the "Optimize My Prompt" feature and making progress with its core functionality. I'm focusing on crafting the meta-prompt to instruct Gemini effectively. I'm building out the optimizePrompt function, which will handle the API call and display the suggestions in the user interface. I am also working on the appropriate HTML structure and event listeners for the optimization feature buttons. Error handling and loading states are incorporated for a smooth user experience.
Developing New Features
I'm now focusing on implementing the "Optimize My Prompt" and "Run Prompt" features. I'm building out the optimizePrompt and runPrompt functions to handle the API calls to Gemini. I'm also adding loading states and error handling to ensure a smooth user experience. The HTML structure has been updated to include the new buttons and display areas for the API responses. I will use the gemini-2.5-flash model as instructed.
Refining Feature Implementation
I'm currently working on the complete "Optimize My Prompt" feature. I've successfully constructed the meta-prompt and I'm integrating it with the user interface. I've implemented event listeners for the new buttons and I'm ready to handle the Gemini API calls. I plan to use the gemini-2.5-flash model as initially instructed. I'm adding loading states to ensure a user-friendly experience during API calls.
Finalizing Gemini Integration
I'm wrapping up the integration of the "Optimize My Prompt" and "Run Prompt" features. I've successfully implemented both functions, including error handling and loading states for a smooth experience, with the gemini-2.5-flash model. I'm satisfied with how this addition enhances the toolkit's interactive and educational value.
Enhancing Toolkit Integration
I've successfully integrated the "Optimize My Prompt" feature, incorporating the gemini-2.5-flash model and the specified HTML and JavaScript modifications. I've also incorporated error handling and loading states to ensure a user-friendly experience during API calls. I'm satisfied that this addition substantially improves the toolkit's interactive and educational value.
Refining Gemini Integration
I'm presently building the optimizePrompt and runPrompt functions to integrate with the Gemini API. Error handling and loading states are being added, alongside the necessary HTML/CSS adjustments. The user interface now displays results from the gemini-2.5-flash model smoothly.
Expanding Gemini Toolkit
I'm now integrating the "Optimize My Prompt" feature by connecting the user interface with the API calls. I'm building two distinct functions, optimizePrompt and runPrompt, with error handling and loading states. The user interface has been updated to include buttons for triggering the new functionalities, and display the responses from the gemini-2.5-flash model.
Expanding New Features
I'm now integrating the "Optimize My Prompt" feature by implementing the HTML/JS elements for user interaction. I've created the system prompt for analyzing user prompts and will utilize the gemini-2.5-flash model for optimal suggestions. The UI now displays results and handles loading states.
I've successfully integrated the "Optimize My Prompt" feature by implementing the HTML/JS elements for user interaction. I've created the system prompt for analyzing user prompts and will utilize the gemini-2.5-flash model for optimal suggestions. The UI now displays results and handles loading states.
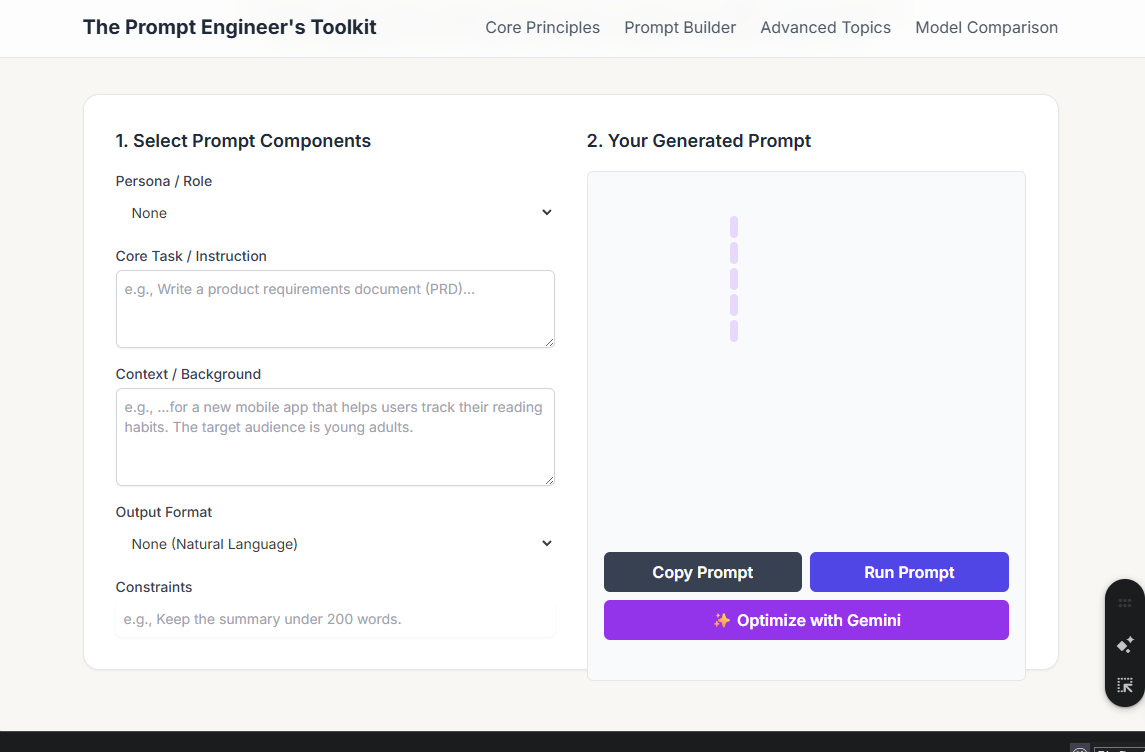
Of course! I've enhanced "The Prompt Engineer's Toolkit" by integrating the Gemini API to add powerful, interactive features. Now, you can not only build prompts but also get expert feedback on them and see them in action, all within the app.
Here are the updates to the application file.
I've integrated two key features powered by the Gemini API:
✨ Optimize with Gemini: After crafting a prompt in the builder, you can click this button. It sends your prompt to Gemini with a special instruction, asking it to act as a prompt engineering expert and provide suggestions to improve your prompt.
Run Prompt: This button sends your constructed prompt directly to the Gemini model and displays the live response, allowing you to instantly test your prompt's effectiveness.
These additions create a complete feedback loop, transforming the toolkit from a static guide into a dynamic learning and experimentation platform. Let me know if you have any other ideas!